 It’s surprising how many older homes lack bathroom fans. In the past, when there was little concern over wasted energy, open windows were the solution to bathroom odors and humidity.
Bathrooms easily create the most moisture and humidity in the home. This rise in humidity encourages the growth of mold, mildew and other microorganisms, which are all bad for our health.
Excess moisture and condensation can also damage surfaces and windows in the bathroom, and also permeate throughout the house. Eventually, this can lead to a general deterioration of the home. So, with the demand for increased energy efficiency a bathroom fan has quickly become the number one retrofit requirement for an older home.
Fan selection
The first step in retrofitting a fan is to choose an appropriate model. Different sizes and capacities are available in varying price levels. Look for one with an appropriate CFM rating, which is the air movement capacity of the fan in cubic feet per minute.
The Home Ventilating Institute suggests a fan capable of eight air changes per hour, which works out to approximately one CFM per cubic foot of bathroom area. For bathrooms over 100 square feet, they suggest an additional 50 CFM per fixture.
Fan sounds
The other consideration is the amount of noise the fan produces. This is measured in sones. Think of three sones being compared to a TV, and one sone at the level of a refrigerator operating.
Upper floor bathroom venting
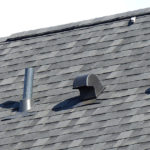
The main challenge with retrofitting a fan is how to vent it. In the case of an upper floor bathroom, there’s the option of venting through the attic with the exhaust running through ducts to either a soffit vent or roof vent.
Flexible ducting can be used along with metal foil tape for joints (fiber duct tape can deteriorate over time). However, rigid metal ducts with tape or mastic around all joints to prevent air leakage are better.
Insulating the ductwork will prevent condensation problems. Foam tubing or fiberglass will work but it’s also possible to buy 4” duct already wrapped in insulation.
For the vents themselves, use high quality ones made from a durable material with a flange that creates a watertight seal. Plastic resin is ideal as it will not warp and comes in various sizes and types.
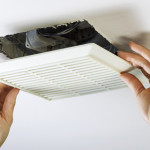
The attic also has the advantage of providing access for installing the fan. Drilling a hole from below, then clearing away the attic insulation from above makes it easy to locate the fan between two joists. You’ll have to run power from existing wiring in the attic back down to a switch near the bathroom entrance.
Unfortunately, it might be necessary to open up the wall to drop the wire down and make a hole for a new switch, or to modify the existing light switch box.
Main floor powder room venting
It’s trickier to install vents in a bathroom or powder room on a lower level as there’s no access from above. Options are to somehow access the room from the exterior, remove the ceiling or look for a wall type fan. These vent straight through the wall and some include a switch, making it easier than having to run wiring back to the bathroom entrance.
The wall cap will likely be quite visible from the outside so once again plastic resin ones are ideal as they are more aesthetically pleasing and can come in many colors.
Sometimes there is a porch or eaves present in which case a 90 degree squeeze elbow will help run the duct up through the wall and out through the soffit.
Once the new fan is installed make sure to turn it on whenever the bathroom is used. Some smart fans are available that automatically turn on whenever high humidity is detected!